Friday, May 18, 2012


Little RED Streetcar

The above streetcar photograph was taken in Woldenberg Park on the banks of the Mississippi River in the French Quarter of New Orleans, Louisiana. Woldenberg Park is a great place to get away from the sometimes crowded and noisy streets of the French Quarter. Plus, there are expansive views of the river.

I first processed the above image in Photoshop CS5 and Color Efex Pro 4 as I would any color image. I then continued to process the photograph as a black and white image in Silver Efex Pro 2. Silver Efex Pro 2 offers many monochrome pre-sets to choose from. The pre-sets can give you a good starting point to begin your processing. I chose the “Full Dynamic (harsh)” preset.  After choosing the Full Dynamic (harsh) pre-set, I then selected the “Yellow Color Filter” to enhance the tonal color of the streetcar. Next, I further adjusted the Brightness, Contrast and Structure of the image. I then brought the RED of the streetcar back into the black and white image by placing “Control Points” on the streetcar and then sliding the “Selective Colorization” slider to a 100 percent. I had to use about a dozen Control Points to bring the red of the streetcar back into the black and white image. Lastly I used the “Color Replacement Tool” in Photoshop CS5 to remove any unwanted color distortions. Silver Efex Pro 2 is an indispensable tool for any photographer looking to step-up their post processing.

See Nik Software's web-site for additional information about Silver Efex Pro 2

See my Facebook page for additional Photography and Photographic Art discussions.

To view my Photographic Art visit: Windows of Photography

Technical Data: Nikon D3 with a Nikon NIKKOR AF-S 24-120mm f/3.5-5.6G lens, Subject Distance: Infinity, Exposure: 1/60s at f/6.3, ISO: 400, Focal Length: 75mm, Filter: Ultra Violet, Lighting: Natural Daylight, Post Processing: Adobe Photoshop CS5 and Nik Software’s Silver Efex Pro 2, Date: 01/17/2012 at 9:49 am

Copyright © 2012 Windows of Photography, All Rights Reserved

Tuesday, May 15, 2012


Texas Wildflower Shoot

I took the above photograph in a field of wildflowers at Baylor University State Park, in Brenham, Texas at the end of March 2012. My NIKKOR 70-300mm zoom lens created a great depth of field effect in this image. The depth of field effect in photography can help to emphasize your subject while de-emphasizing your foreground and background. Even though the depth of field de-emphasized the foreground and background they contribute to the mood and artistic value of the photograph. The out of focus areas give the flowers and the tree in the background a somewhat painterly look.

For an in-depth explanation of Depth-of-Field see Wikipedia.

See my Facebook page for additional Photography and Photographic Art discussions.
To view my Photographic Art visit: Windows of Photography

Technical Data: Nikon D3 with a Nikon NIKKOR AF-S 70-300mm f/4.5-5.6G lens, Subject Distance: 9.4 meters, Exposure: 1/400s at f/10.0, ISO: 1000, Focal Length: 250mm, Filter: Ultra Violet, Lighting: Natural Daylight, Post Processing: Adobe Photoshop CS5 and Nik Softwar’s Color Efex Pro 4, Date: 03/31/2012 at 9:21 am

Copyright © 2012 Windows of Photography, All Rights Reserved

Friday, May 4, 2012


Rule of Thirds

The “Rule of Thirds” in many cases makes for a more appealing image. This rule segments your image into nine equal parts with two vertical and two horizontal lines as above. The idea behind the Rule of Thirds is that your subject occupies one of the four intersecting guidelines. This technique is said to create tension and interest within the composition. The Rule of Thirds can turn a center-weighted (mundane) image into an image with emotion and feeling.
 
Please note that the Rule of Thirds is only a guide and is not written in stone. It would soon become very boring if every photograph was processed with the Rule of Thirds. You should always use your own artistic eye and values to create images of interest.

See my Facebook page for additional Photography and Photographic Art discussions.
 
To view my Photographic Art visit: Windows of Photography
 
Technical Data: Nikon D3 with a Nikon NIKKOR AF-S 24-120mm f/3.5-5.6G lens, Subject Distance: 5.96 meters, Exposure: 1/60s at f/8.0, ISO: 400, Focal Length: 110mm, Filter: Ultra Violet, Lighting: Natural Daylight, Post Processing: Adobe Photoshop CS5 and Nik Software’s Color Efex Pro 2, Date: 02/25/2012 at 5:22 pm

Copyright © 2012 Windows of Photography, All Rights Reserved

Tuesday, April 24, 2012


Tilt-Shift (It's Just An Illusion)

The above photographs were processed in Photoshop CS5 as Tilt-Shit images. Tilt-Shift imagery is really an optical illusion. A Tilt-Shift image tricks’ the viewer’s eyes (and mind) in believing that they are looking at a photograph of a miniature diorama.

The following steps will assist you in creating your own Tilt-Shift images:
  1. Choose the right photograph (typically an image shoot from above works best).
  2. In Photoshop select the Edit in Quick Mask Mode (Q)
  3. Then select the Gradient Tool (G)
  4. Then within the Gradient Tool Bar select the Reflected Gradient icon
  5. In the Gradient Editor use the pull-down menu and select Foreground to Background
  6. Make sure in the Set Foreground Color that Black is the foreground and White is the background
  7. Now select your focus area by placing your curser on your image and click and hold your left mouse button and dragging it across your focus area then release your mouse button. Your focus area should appear in a transparent red glow.
  8. Now select the Edit in Standard Mode (Q) icon again.  You should see an outline of marching ants.
  9. Select Filter > Blur > Lens Blur.  This will open your image in a new window.
  10. In the Lens Blur windows adjust the Iris Radius (typically I find that 20-30 is a good number, but you’ll have to use your own judgment at this point).
  11. When you’re happy with your Iris Radius setting select OK.
  12. To remove the marching ants press CNRL-D.
  13. At this point if you have not done it yet, you may want to consider increasing the Saturation, Contrast and/or Structure of your image to increase the modeling effect of your photograph.
See my Facebook page for additional Photography and Photographic Art discussions.
 
To view my Photographic Art visit: Windows of Photography

Metadata: Nikon D3 with a Nikon NIKKOR AF-S 24-120mm f/3.5-5.6G lens, Subject Distance: Infinity, Exposure: 1/60s at f/6.3, ISO: 200, Focal Length: 24mm, Filter: Circular Polarizer, Lighting: Natural Daylight, Post Processing: Adobe Photoshop CS5, Date: 07/31/2010 at 11:20 am

Copyright © 2012 Windows of Photography, All Rights Reserved

Saturday, April 21, 2012


Beauty Glow

One of the ways you can use the sun in your photographs is to place your subject directly in front of the sun as in the above photograph. In the above photograph, it was late afternoon and the sun was low over the horizon. The sun can create a desirable halo or glow effect as an outline to your subject. I did not use a flash to front light the model in the above image. I wasn’t having any problems with uneven shadowing because of the trees overhead. You may want to consider using some type of lighting at times to fill-in shadows if desired. Photography is an art form and the conditions and subject should always be speaking to the creative goals of the photographer.

Visit Brazos Bend State Park's web-site for more details.

See my Facebook page for additional Photography and Photographic Art discussions.
 
To view my Photographic Art visit: Windows of Photography

Technical Data: Nikon D3 with a Nikon NIKKOR AF-S 24-120mm f/3.5-5.6 G lens, Subject Distance: 5.96 meters, Exposure: 1/60s at f/8.0, ISO: 200, Focal Length: 120mm, Filter: Ultra Violet, Lighting: Natural Daylight, Post Processing: Adobe Photoshop CS5/Nik Software, Color Efex Pro 2, Date: 02/25/2012 at 6:17 pm, Location: Brazos Bend State Park, 21901 Farm to Market 762, Needville, TX 77461, USA

Copyright © 2012 Windows of Photography, All Rights Reserved

Friday, April 13, 2012


Bronze Horse

The above photograph was taken at Hilton’s Waikoloa Village Resort on Hawaii’s Big Island in 2010. Simply put, the Hilton Waikoloa Village Resort is beautiful. The resort is composed of 62 acres of recreational activities, shopping, restraints, ocean front views, extensive plant life and art. Yes, I said art. There are over 1800 works of art on display throughout the resort at an original cost of over seven-million dollars. The Hilton Waikoloa Village Resort could be considered one of the most beautiful art museums in the world. Photography is my chosen creative artistic outlet. But, I appreciate most forms of art. I enjoy photographing sculpture art if it has a suitable background. Photographing sculptured artwork is like photographing a still-life but in an action pose. I find that the bronze horse sculpture above gives a real sense of movement. My attempts to discover the name of the artist of the bronze horse unfortunately has gone unanswered. So, I am unable to give created to the artist at this time. If anyone out there knows of the above sculpture and the artist please e-mail me their name so that I can update this blog entry.

For more information see the: Hilton's Waikoloa Village Resort

See my Facebook page for additional Photography and Photographic Art discussions.

To view my Photographic Art visit: Windows of Photography

Metadata: Nikon D3 with a Nikon NIKKOR AF-S 24-120mm f/3.5-5.6G lens, Subject Distance: Infinity, Exposure: 1/80s at f/5.0, ISO: 200, Focal Length: 55mm, Filter: Circular Polarizer, Lighting: Natural Daylight, Post Processing: ACDSee Photo Editor 2008, Date: 07/31/2010 at 8:46 am

Copyright © 2012 Windows of Photography, All Rights Reserved

Tuesday, April 10, 2012


Shades of Gray

I am enjoying monochrome photography more than ever. I love shooting in color but, sometimes a mundane color photograph can become an incredible Black and White image. It seems that the lack of color in an image can sometimes help to convey emotion to the viewer. With today’s post processing editing tools you can shoot in color and then process the same color image into an incredible monochrome photograph.

The above photograph was taken in Jackson Square, New Orleans.  I am currently using Nik Software’s, Silver Efex Pro 2 in conjunction with Adobe Photoshop CS5 to post process my Black and White images. Silver Efex Pro is a plug-in to Photoshop and Lightroom. In Silver Efex Pro you have many presets to choose from. The presets give you a starting point in the post processing of your monochrome images. If you are considering processing monochrome images and you are using Adobe’s Photoshop and/or Lightroom I would recommend that you consider taking a look at Nik Software’s, Silver Efex Pro 2.

For more information see Nik Software - Silver Efex Pro 2 and the Jackson Square web-sites.
 
See my Facebook page for additional Photography and Photographic Art discussions.
 
To view my Photographic Art visit: Windows of Photography

Technical Data: Nikon D3 with a Nikon NIKKOR AF-S 24-120mm f/3.5-5.6G lens, Subject Distance: Infinity, Exposure: 1/400s at f/6.3, ISO: 200, Focal Length: 24mm, Filter: Ultra Violet, Lighting: Natural Daylight, Post Processing: Adobe Photoshop CS5 & Nik Software – Silver Efex Pro 2, Date: 01/17/2012 at 9:30 am

Copyright © 2012 Windows of Photography, All Rights Reserved

Tuesday, March 20, 2012


Curious Little Meerkat

The above photograph was taken at the Houston Zoo in 2011. I personally love this photograph! I was only 2 meters (about 6 feet) away from this curious little Meerkat when I took this image. Meerkats are typically very skittish but, it appears that they can also be very curious animals at the same time. This Meerkat was not focused on me but, instead it was focused on my rather large 300mm lens. When photographing wild animals in a zoo or in the wild it always pays to make small, slow deliberate movements.

To learn more about Meerkats visit the Wikipedia and Houston Zoo web-sites.

See my Facebook page for additional Photography and Photographic Art discussions.

To view my Photographic Art visit: Windows of Photography

Metadata: Nikon D3 with a Nikon NIKKOR AF-S 70-300mm f/4.5-5.6G lens, Subject Distance: 2.0 meters, Exposure: 1/125s at f/5.6, ISO: 200, Focal Length: 300mm, Filter: Ultra Violet, Lighting: Natural Daylight, Post Processing: Adobe Photoshop CS5, Date: 11/01/2011 at 1:58 pm

Copyright © 2012 Windows of Photography, All Rights Reserved

Thursday, March 1, 2012


Tears of a Bride

I took the above photograph as part of a Photography Workshop call WOW-8 (White Outdoor Wedding) photo shoot sponsored by Photo Binder and One Talent Source. The Workshop was scheduled to start at 3:00 pm and my wife and I arrived at the Brazos Bend State Park in Needville, Texas for 2:30 pm. Unfortunately when we drove up to the State Park it was raining. Fortunately it only rained for about an hour. When we started the photo shoot everything was wet and it was dark with overcast skies. Even though the conditions were not ideal there is always an opportunity for photography if you look for them. The models, hair styles and makeup artist were great. They did not complain about the weather are the wet conditions.  As soon as it stop raining the models went right to work providing awesome photographic opportunities for the photographers. With the help of the model, I took advantage of the wet mirror in an effort to portray an image of a brides’ unfulfilled moment.

I had never worked with professional models before until this workshop. From this experience I high recommend that if you get an opportunity to work with professional models jump on it. A professional model will make your work interesting and rewarding.

For more information see: Brazos Bend State Park and The Photo Binder

See my Facebook page for additional Photography and Photographic Art discussions.

To view my Photographic Art visit: Windows of Photography

Technical Data: Nikon D3 with a Nikon NIKKOR AF-S 24-120mm f/3.5-5.6G lens, Subject Distance: Infinity, Exposure: 1/160s at f/8.0, ISO: 640, Focal Length: 62mm, Filter: Ultra Violet, Lighting: Natural Daylight, Post Processing: Adobe Photoshop CS5 and Nik Color Efex Pro 4, Date: 02/25/2012 at 4:37 pm

Copyright © 2012 Windows of Photography, All Rights Reserved

Monday, February 20, 2012


Laissez les bons temps rouler
(Let the Good Times Roll)

The above photograph is a small piece of a fantastic window display from a boutique called Razzle Dazzle. Razzle Dazzle is located at 524 Royal Street in the French Quarter of New Orleans. In my opinion Razzle Dazzle is a shopping destination when in New Orleans. Razzle Dazzle has very unique gifts and holiday items and ideas.

The photograph above and this blog are in celebration of Mardi Gras 2012. I photographed this image through a glass display window. To eliminate reflections and ghosting in the image I used a Circular Polarizer Filter. Even though a Polarizer Filter helps a great deal you also need to find the best angle to shoot your image. I also had to pump-up the ISO to 640 because the window was in fairly dim light. Now go out and shoot a window display.

For more information see: Razzle Dazzle and Wikipedia - Mardi Gras
 
See my Facebook page for additional Photography and Photographic Art discussions.

To view my Photographic Art visit: Windows of Photography

Technical Data: Nikon D3 with a Nikon NIKKOR AF-S 24-120mm f/3.5-5.6G lens, Subject Distance: 0.67 meters, Exposure: 1/25s at f/6.3, ISO: 640, Focal Length: 78mm, Filter: Circular Polarizer, Lighting: Natural Daylight, Post Processing: Adobe Photoshop CS5, Date: 01/17/2012 at 9:01 am

Copyright © 2012 Windows of Photography, All Rights Reserved

Monday, February 6, 2012


Frozen Grace

I took the above photographs at the Audubon Nature Institute in New Orleans in 2009. The top photograph is what you might classify as a standard photograph. Although I think it’s pretty good and certainly not standard. I used ACDSsee Photo Manager 12 for the post processing of the image. The bottom photograph is the same photograph but I processed it in ACDSee Photo Manager 12 as a HDR (High Dynamic Range) image using three consecutive images with an Exposure Value (EV) of +/- 1.0. HDR processing can produce a more surreal looking photograph but, most of the time I prefer an image that is realistic looking. What I like about HDR photography and its post processing is the ability to produce a more 3-Dimensional image. Even though I captured the above HDR photograph using a hand held technique (tucking my elbows in to my sides), I strongly recommend using a tripod for stability. I also recommend using a remote shutter release trigger. When shooting HDR images it is very important to take your time. Look through your camera’s view finder and envision the final results. Think about where your light source is coming from and how this will affect your final image. But, as always, have fun with your photography.

For more information about HDR Photography and the Audubon Nature Institute see the links below:

To learn more about HDR Photography see the Pixiq and HDR Cream web-sites.

See my Facebook page for additional Photography and Photographic Art discussions.

To view my Photographic Art visit: Windows of Photography

Technical Data: Nikon D3 with a Nikon NIKKOR AF-S 70-300mm f/4.5-5.6G lens, Subject Distance: 6.31 meters, Exposure: 1/60s at f/5.0, ISO: 200, Focal Length: 180mm, Filter: Ultra Violet, Lighting: Natural Daylight, HDR: Yes, Bottom Image, Post Processing: ACDSee Photo Manger 12, Date: 08/05/2009 at 11:22 am

Copyright © 2012 Windows of Photography, All Rights Reserved

Wednesday, February 1, 2012


Nik Software - Silver Efex Pro 2

At the 2012 ImageUSA Image Expo in New Orleans I purchased Nik Software's Complete Collection (Professional Photographic Tools). Within the Complete collection of software plug-ins for Adobe's Photoshop and Lightroom there is Nik Software's Silver Efex Pro 2. Silver Efex Pro 2 is a Black and White imaging processing software tool. It has over three dozen presets which can make for a great starting point when creating a Black and White image. This software also features the use of Control Points. With a Control Point or Points you can selectively spot process desired areas of your image. The Control Point feature is a very nice tool to have in your tool box. Silver Efex Pro 2 also has a set of adjustable Color Filters, Film Types and Finishing Adjustments tools. Silver Efex Pro 2's extensive features and adjustments allow the photographer the ability to create the exact Black and White image they had envisioned. Nik Software also provides Live Training and On Demand Videos of their products for members over the Internet. You should take the time to learn your software tools, and experiment with them, break the rules. Who knows, you may even invent a new rule.

While at the Expo in New Orleans I took the above photograph of a statue of President Andrew Jackson in Jackson Square. First I processed the color image in Adobe's Photoshop Bridge and then I saved it. Secondly I used one of Silver Efex Pro 2's presets and then i used several Control Points to increase the white and contrast effects of the clouds. And, then I saved this image with a different file name. I always preserve the original NEF (Nikon Electronic Format) image file for future processing. Nikon Electronic Format is Nikon's RAW file format that features image information and metadata received from the camera's sensors.

To learn more about Silver Efex Pro 2 visit: Nik Software's website

To learn more about President Andrew Jackson and Jackson Square, New Orleans, see the links below:
 
Also, see Widipedia to learn more of Andrew Jackson and Jackson Square (New Orleans, Louisiana).

See my Facebook page for additional Photography and Photographic Art discussions.

To view my Photographic Art visit: Windows of Photography

Copyright © 2012 Windows of Photography, All Rights Reserved

Sunday, January 29, 2012


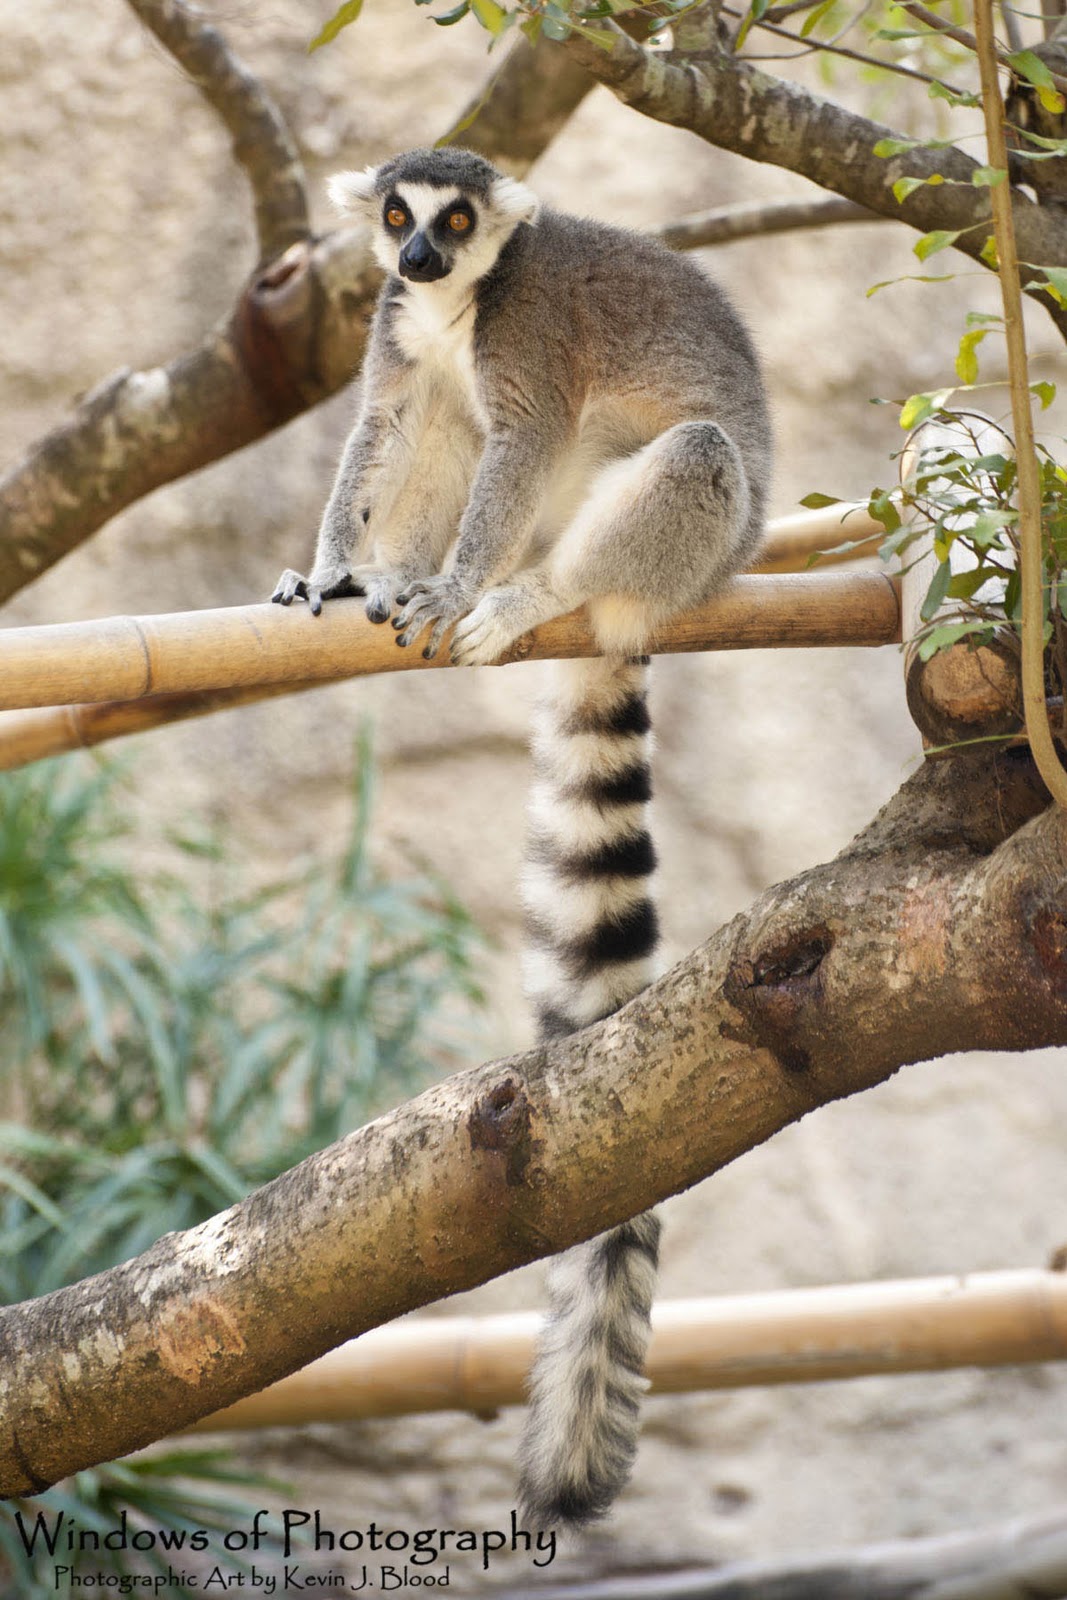
Ring-tailed Lemur

I captured this image of a Ring-tailed Lemur at the Houston Zoo in 2011. The Ring-tailed Lemur is originally from the island of Madagascar. Ring-tailed Lemurs are quite intelligent and very social, living in large groups. Lemur groups are also leaded by a matriarch. All Lemurs have a strong sense of smell and they use scent glands to mark their territory. Lemurs are also very vocal. They will use calls among each other to signal alarms and to maintain group cohesion. As a species the Lemur is considered Near Threatened by the International Union for Conservation of Nature (IUCN) Red List.

To learn more about the Ring-tailed Lemur visit Wikipedia. Also, visit the web-site of the IUCN to learn more about the International Union for Conservation of Nature.

See my Facebook page for additional Photography and Photographic Art discussions.

To view my Photographic Art visit: Windows of Photography


Metadata: Nikon D3 with a Nikon NIKKOR AF-S 70-300mm f/4.5-5.6G lens, Subject Distance: 5.62 meters, Exposure: 1/10s at f/5.6, ISO: 200, Focal Length: 155mm, Filter: Ultra Violet, Lighting: Natural Daylight, Post Processing: Adobe Photoshop CS5, Date: 10/11/2011 at 10:26 am

Copyright © 2012 Windows of Photography, All Rights Reserved

Friday, January 13, 2012


Fox Squirrel

While on an outing to the Houston Zoo with my wife I captured the above image of a Fox Squirrel. Fox Squirrels are the largest specie of tree squirrels native to North America. The Fox Squirrel can easily be mistaken for the American Red Squirrel or the Eastern Gray Squirrel. There were Fox Squirrels all around the Houston Zoo but, they were very hard to photograph because they would run and hide every time I pointed my camera at them. I guess they looked at my 70-300mm telephoto lens and thought better safe the sorry. As we turned a corner I saw the above squirrel preoccupied with eating. I had to slowly and smoothly swing my camera into place for the shot. I was only able to get this one image of this squirrel before it was gone. But I got lucky and it made for a great photograph. When photographing wildlife even in a zoo it pays to be ready at all times.

See the following Wikipedia link to learn more about the Fox Squirrel.

See my Facebook page for additional Photography and Photographic Art discussions.

To view my Photographic Art visit: Windows of Photography

Metadata: Nikon D3 with a Nikon NIKKOR AF-S 70-300mm f/4.5-5.6G lens, Subject Distance: 5.01 meters, Exposure: 1/10s at f/5.6, ISO: 200, Focal Length: 220mm, Filter: Ultra Violet, Lighting: Natural Daylight, Post Processing: Adobe Photoshop CS5, Date: 10/11/2011 at 10:20 am

Copyright © 2012 Windows of Photography, All Rights Reserved

Tuesday, January 10, 2012


Royal Poinciana

During a trip to Waikoloa Village on Hawaii's Big Inland I took the above photograph of this Royal Painciana. The Royal Poinciana were not as full of flowering blooms as I wished but, sometimes you have to work with what you get. One of the best parts of this image beside the red of the blooms and the different shadings of the green leaves was the blue of the sky. I obtained this nice blue sky by using a Circular Polarizer filter. As I have stated in past blogs a Circular Polarizer filter can make the sky in your images a more natural and truer blue by reducing the harsh light from the sun. A Circular Polarizer is also great for reducing the glare and hotspots from reflective materials such as water and class. To use a Circular Polarizer filter is very easy. Just turn the Circular Polarizer filter until the image in your view finder is at its darkest. I have a Circular Polarizer filter for each of my lens.

Delonix Regia (Royal Poinciana): A native of Madagascar, but grows freely in many other places such as Hawaii, where it is also known as the Flamboyant Tree, Mohur Tree and Red Flame. It blooms in about July or August usually and can reach 40-80 feet, spredding out to the side as well as high.

See the following Wikipedia link to learn more about the Royal Poinciana.
 
See my Facebook page for additional Photography and Photographic Art discussions.

To view my Photographic Art visit: Windows of Photography


Technical Data: Nikon D3 with a Nikon NIKKOR AF-S 24-120mm f/3.5-5.6G lens, Subject Distance: 5.96 meters, Exposure: 1/80s at f/5.0, ISO: 200, Focal Length: 58mm, Filter: Circular Polarizer, Lighting: Natural Daylight, Post Processing: ACDSee Photo Editor 2008, Date: 07/28/2010 at 10:32 am

Copyright © 2012 Windows of Photography, All Rights Reserved